In this tutorial, we will be using mini solar panels and attaching them to a piece of fabric using sewable snaps. Each of these solar panels is capable of producing 690mV and 30.7mW of power. (More info on other hook-up methods here)
Materials required:
- Fabric (any fabric)

- Conductive fabric tape
- Conductive thread
- Sewable snaps (conductive)
- Sewing needle
- Soldering Iron
- Helping Third Hand
- Mini solar panels

Step 1: Cut two strips of the conductive tape. Use the adhesive side of the tape to attach both to the fabric as two parallel lines (we will use one as the positive side and the other as the negative).

Step 2: After placing the conductive tape on the fabric, prepare your sewing needle using the conductive thread.

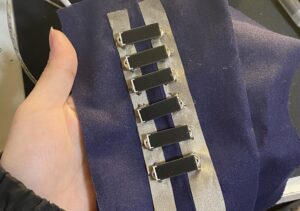
Step 3: To attach the solar panels to the fabric with snaps, we will be sewing one of these conductive snaps to the fabric and soldering the other to the panel. For sewing the snaps to the fabric, take two “bottom” snaps (as shown).

Step 4: (a) Take a mini solar panel and mark where the snaps should go according to its length. Then sew them as shown onto the fabric, on top of the conductive tape.

Step 4: (b) While sewing the snaps, make sure the conductive thread on the back of the positive side of the fabric does not touch the negative side, as that could lead to a short. (If you have any longer loose ends, like in the image, cut them short. or add some electrical tape or fabric glue, to ensure those loose threads don’t move around.).

Step 5: After you’re done, place one of the “top” snaps on the solar panel and hold it in place as shown using the helper hands.

Step 6: Use the soldering iron to solder the snap to the solar panel. Be careful not to have bumps/too much solder (or it will be harder to attach it to the bottom snap that’s already sewn onto the fabric).

Step 7: Take another “top” snap and solder it on the other end of the panel.
Step 8: You’re done! You should be able to attach the panel to the fabric now. Make sure you attach the positive side of the panel to the positive tape and the negative side to the negative tape. (The negative side of the panel has a white strip on its back).
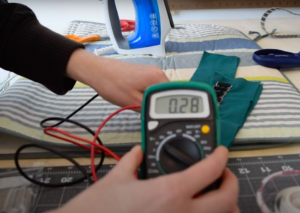
A multimeter should give you a reading of around 0.3V in a bright room, and 0.6V+ in full sun.
To power a single LED, you would need around 2-3.5V (depending on the color- red would need the lowest and blue/white would need the highest).